

FLUX.1 Kontext · 3D Print Style (Image to Image)
3D
3D Print
Flux Kontext
Image
image editing
Imageto3D
LoRAs
Mockup
929
_1778129692947.png?width=1400&height=620&quality=80&resize=contain)
_1778129692948.png?width=1400&height=620&quality=80&resize=contain)
_1778129692947.png?width=104&height=104&quality=80&resize=cover)
_1778129692948.png?width=104&height=104&quality=80&resize=cover)

Nodes & Models
LoadImage
GetNode
CLIPTextEncode
PreviewImage
KSamplerSelect
VAELoader
ae.safetensors
Note
PrimitiveInt
RandomNoise
UNETLoader
FLUX1/flux1-dev-kontext_fp8_scaled.safetensors
DualCLIPLoader
t5xxl_fp16.safetensors
clip_l.safetensors
FluxKontextImageScale
EmptySD3LatentImage
ModelSamplingFlux
SetNode
LoraLoaderModelOnly
3DPrinted-3d-print-lora-and-flux-k-3HFhIMkm.safetensors
VAEEncode
BasicScheduler
ReferenceLatent
BasicGuider
SamplerCustomAdvanced
VAEDecode
SaveImage
FluxGuidance
FloyoStickyNote
ABOUT THE WORKFLOW
Turn a photo into a 3D print
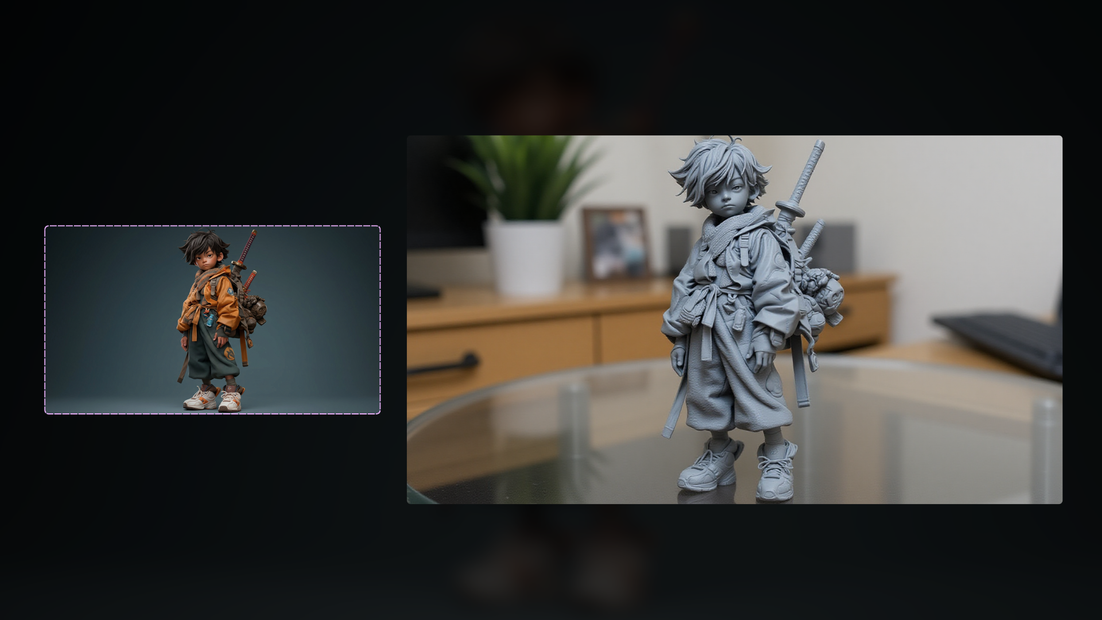
Upload any image and get back a version that looks like a physical 3D-printed model sitting on a surface. Set the filament colour, the format, and where it rests, and the workflow renders your subject in that style. The result is an image of a printed model, not a printable file.
Model
FLUX.1 Kontext Dev by Black Forest Labs. A 12B image editing model that follows a text instruction while holding onto the subject from your image. Open weights under the FLUX.1 Non-Commercial License. Paired here with a community 3D Print LoRA that adds the look of consumer FDM prints: layer lines, plastic sheen, and a matte finish.
HOW IT WORKS
Step 1. Upload your image
The photo, illustration, or character you want turned into a 3D print.
Works great with: characters · figures · logos · product shots
Step 2. Describe the print
Set the filament colour (grey, red, white, rainbow), the format (bust, full figure, figurine), and where it sits (table, desk, hand). For example: "convert this into a grey plastic 3D print on a desk."
Step 3. Hit run and download
The model restyles your image into a printed-model look. Preview it in the workflow, then download.
Ready for: mockups · social · concept boards
First time? Leave every setting as-is. The defaults (1024x1024 · 20 steps · guidance 2.5) are the right starting point for almost everyone.
RECOMMENDED SETTINGS
Quick-start guide. Find the goal that matches yours and copy the settings.
Standard use (most people) — 1024x1024, 20 steps, guidance 2.5, batch 1. The right starting point for almost everyone.
Want more detail — raise the steps above 20. It sharpens the layer lines and fine surface detail and takes a little longer.
The print is not following your prompt — raise guidance above 2.5 so it sticks closer to your instruction. Lower it if the result looks stiff or over-cooked.
Want options to choose from — raise the batch size to render several prints in one run and keep the best.
Change the colour or format — say it in the prompt, like "red PLA full figure" or "white matte bust," rather than changing a setting.
Want the exact same result again — set a fixed seed in place of random. Random gives you a fresh take on each run.
Prompt: Write it as an edit instruction that names the print. "Convert this into a grey plastic 3D print with an entry-level printer look, sitting on a desk" beats "make it 3D." Call out the filament colour, whether it is a bust, figure, or figurine, and the surface it rests on. Keep the subject description short so the model holds onto your original image.
LEARN
📹 Videos
ComfyUI 101 Free Course ft. Sebastian Kamph
Floyo 101 for Team Collaboration
✨ Quick links
USE CASES
🧸 Figurine Mockups
Preview a character or mascot as a printed figure before you model or order one.
🖨️ 3D Print Previews
Show a client what a design would look like as a physical print without running the printer.
🎨 Concept & Merch
Turn artwork or a logo into a collectible-figure render for pitches and merch boards.
📱 Social Content
Make a printed-model version of a photo or character for posts and thumbnails.
WHAT WORKS BEST / WHAT TO AVOID
✅ Works great
A single, clear subject
Characters, figures, and products
Clean or plain backgrounds
Prompts that name colour, format, and placement
⚠️ May produce softer results
Busy scenes with many subjects
Tiny or thin details a printer would lose
Flat, text-heavy images
Low-resolution source images
FAQ
What is FLUX.1 Kontext?
FLUX.1 Kontext is a 12B image editing model from Black Forest Labs. It changes an image from a plain-language instruction while keeping the subject and its details consistent. This workflow runs the open-weights Dev version paired with a community 3D Print LoRA to give the result a printed-model look.
How does this turn a photo into a 3D print look?
Kontext follows your instruction to restyle the image, and the 3D Print LoRA layers in the cues of a consumer FDM print, like visible layer lines, plastic sheen, and a matte finish. You steer the outcome with the prompt by naming the filament colour, the format, and where the model sits.
Can I 3D print the result?
No. The output is an image that looks like a 3D print, not a printable mesh or STL file. It is meant for previews, mockups, and content. If you need a file you can send to a printer, use an image-to-3D mesh workflow that outputs a 3D model.
What should I put in the prompt?
Describe the print itself: the filament colour such as grey, red, white, or rainbow, the format such as a bust, full figure, or figurine, and the surface it rests on like a table or desk. Keep the description of the original subject short so the model preserves it.
Can I use FLUX.1 Kontext outputs commercially?
FLUX.1 Kontext Dev is released under the FLUX.1 Non-Commercial License, which covers research and non-commercial use. Black Forest Labs offers a self-serve portal for a commercial license, and the community 3D Print LoRA carries its own terms, so check both before using results in commercial work.
How is Kontext Dev different from Kontext Pro and Max?
Dev is the open-weights 12B version you can run locally, which is what this workflow uses. Pro and Max are proprietary models offered through an API with higher performance and stronger typography. Dev trades a little of that for open access and local control.
How to run FLUX.1 Kontext online?
You can run FLUX.1 Kontext online through Floyo. No installation, no setup, no API key to wire up. Open the workflow in your browser, upload an image, describe the print, and hit run. Free to try.
WHY FLOYO?
Floyo is the only platform with team collaboration for ComfyUI in the browser. You run workflows with no install. You share run history, assets, and models across your team. You pay only when you generate. Floyo supports open-source and closed-source models.
A designer renders a print mockup and likes it. A teammate opens that exact run from shared history and keeps going. No file handoffs. No version confusion.
For studios and enterprise teams, Floyo adds private workspaces, pooled resources, and a team usage dashboard. Other ComfyUI cloud tools run for one person at a time. Floyo runs for the whole team, with transparent per-generation costs.
Ready to try it?
Upload an image, describe the print, and run it. The settings are already set.
Questions? Watch the free course or check the FAQ above.
Read more

_1786518453053.png?width=400&height=300&quality=80&resize=cover)





