BiRefNet for Microscope Auto Segmentation
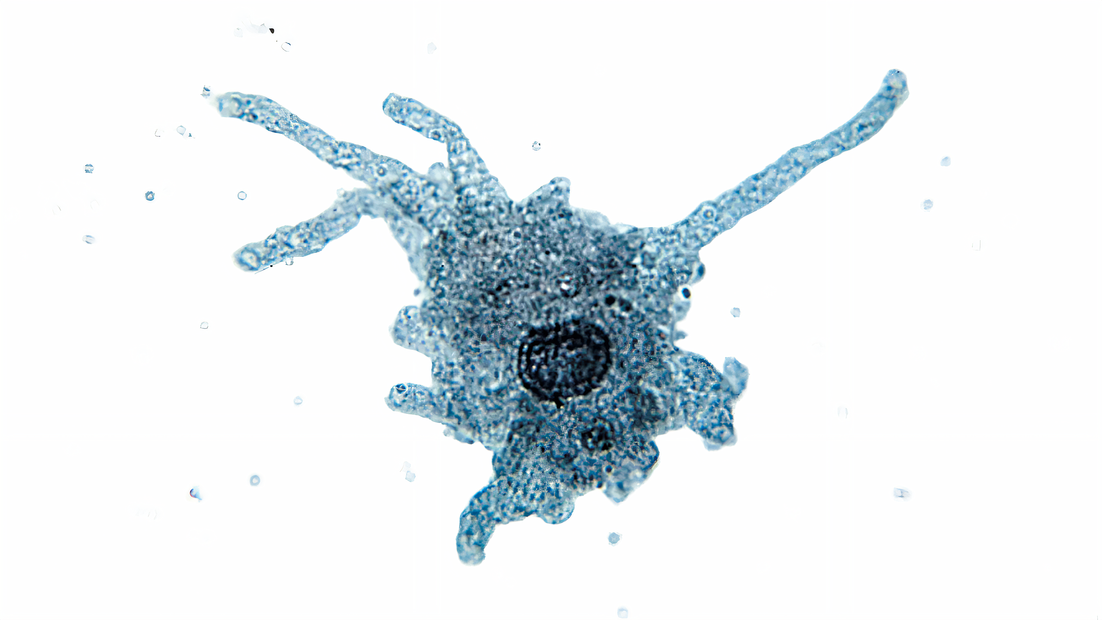
Drop in a microscope photo and BiRefNet finds the main subject, cuts it out, places it on a clean background, then upscales and sharpens it. Upload an image and hit run.
birefnet
Image
microscope
object isolation
rmbg
238
_1782392938384.png?width=1400&height=620&quality=80&resize=contain)
_1782392938384.png?width=1400&height=620&quality=80&resize=contain)
_1782449441445.png?width=1400&height=620&quality=80&resize=contain)
_1782392938384.png?width=104&height=104&quality=80&resize=cover)
_1782392938384.png?width=104&height=104&quality=80&resize=cover)
_1782449441445.png?width=104&height=104&quality=80&resize=cover)

Nodes & Models
LoadImage
EmptyImage
UpscaleModelLoader
4x-UltraSharp.pth
Note
BiRefNetRMBG
ImageCompositeMasked
ImageUpscaleWithModel
ImageSharpen
PreviewImage
SaveImage
ABOUT THE WORKFLOW
Isolate and Clean Up a Sample
Upload a microscope image and the workflow finds the main subject on its own, removes the background, and drops the subject onto a flat color of your choice. It then runs a 4x upscale and a strong sharpen pass, so you get one clean, high-resolution shot of the isolated specimen. No painting, no manual masking.
Model
BiRefNet by Zheng Peng and team. An open-source high-resolution segmentation model that separates a subject from its background with clean edges, even on fine or complex shapes.
4x-UltraSharp. An open-source upscale model that takes the isolated subject up to four times its size while holding detail.
HOW IT WORKS
Step 1. Upload your microscope image
The capture you want to isolate. One clear specimen reads best.
Works great with: cell samples · microorganisms · slides · any single subject shot
Step 2. Pick your background color (optional)
White is the default and the best choice for dark or colored subjects. Switch to black when your sample is bright or translucent.
Step 3. Hit run and download
The workflow isolates the subject, places it on your background, upscales it 4x, and sharpens it into one final image. Preview it, then download.
Ready for: Photoshop · figure layouts · slides · any editor
First time? Leave every setting as-is. The defaults (BiRefNet-general · white background · 4x upscale) are the right starting point for almost everyone.
RECOMMENDED SETTINGS
Quick-start guide. Find the goal that matches yours and copy the settings.
Standard isolation (most people) — BiRefNet-general · white background · 4x upscale. The right starting point for almost everyone.
Bright or translucent sample — Switch the background color to black. Translucent edges read more clearly against dark than against white.
Want a softer or smoother result — Lower the sharpen amount below the default. The strong default sharpen suits high-detail specimens and can look harsh on smooth ones.
Need a specific canvas size — Change the background width and height. The default is 1280 by 720, sized for a standard figure slot.
The edges look rough or the subject is partly cut — Your source likely has low contrast between subject and background. Re-shoot or pick a frame where the specimen stands apart from what is behind it.
The background did not come out fully clean — Multiple overlapping objects confuse the cut. Use a frame with one clear main subject.
Prompt: This workflow takes no text prompt. The result is driven by your source image and the background color, so the two things to get right are a clear, well-lit capture with one main subject and a background color that contrasts with it.
LEARN
📹 Videos
ComfyUI 101 Free Course ft. Sebastian Kamph
Floyo 101 for Team Collaboration
✨ Quick links
USE CASES
🔬 Lab Researchers
Turn a raw slide capture into a clean, isolated subject on a uniform background, ready for documentation and records.
📄 Scientific Publishing
Prepare figure-ready specimen images with consistent backgrounds across a paper or poster, no manual cutout work per image.
🎓 Science Educators
Pull a single organism or structure out of a busy field of view so students see one clear subject in slides and handouts.
🔭 Hobbyist Microscopy
Share a polished, zoomed-in shot of your sample. Isolate it, clean the background, and sharpen it for posts or prints.
WHAT WORKS BEST / WHAT TO AVOID
✅ Works great
One clear specimen against a busy or uneven background
Good contrast between the subject and what is behind it
Well-lit, in-focus captures
Dark or colored subjects on a white background
⚠️ May produce softer results
Translucent specimens on white (switch to black)
Several overlapping objects in one frame
Very faint or low-contrast samples
Heavily blurred or out-of-focus source images
FAQ
What does this microscope isolation workflow do?
It takes a microscope image, finds the main subject automatically, removes the background, and places the subject on a flat color you choose. It then upscales the result 4x and applies a sharpen pass. You get one clean, high-resolution image of the isolated specimen without drawing a mask.
What is BiRefNet?
BiRefNet is an open-source, high-resolution image segmentation model built on a bilateral reference design. It separates a subject from its background with precise boundaries, holding fine detail on thin or complex edges. That makes it a strong fit for isolating specimens out of a cluttered microscope frame.
Do I need to select the object or draw a mask myself?
No. BiRefNet detects the main subject and builds the cutout on its own. There is no manual masking or painting step. You upload the image, and the workflow handles the isolation.
What background color should I use for microscope samples?
White is the default and works best for dark or colored subjects. Switch to black for bright or translucent samples, where light edges show up more clearly against a dark field. You can also set other solid colors if a specific background suits your figures.
Does the 4x upscale add real detail or just enlarge the image?
The 4x-UltraSharp model reconstructs and refines detail as it enlarges, rather than stretching pixels. Combined with the sharpen pass, it gives the isolated subject a crisp, zoomed-in look. It works from what is in your source, so a sharp input produces a sharper result.
Can I use this for things other than microscope images?
Yes. The pipeline isolates any clear main subject, cleans the background, and upscales it, so it also suits product shots, specimens, or any single-object photo. It is tuned for microscope work, but the same steps apply to other subjects with good contrast.
How to run BiRefNet online?
You can run BiRefNet online through Floyo. No installation, no setup, no API key to wire up. Open the workflow in your browser, upload your image, and hit run. Free to try.
WHY FLOYO?
Floyo is the only platform with team collaboration for ComfyUI in the browser. You run workflows with no install. You share run history, assets, and models across your team. You pay only when you generate. Floyo supports open-source and closed-source models.
A researcher runs an isolation and likes the result. A teammate opens that exact run from shared history and keeps going. No file handoffs. No version confusion.
For studios and enterprise teams, Floyo adds private workspaces, pooled resources, and a team usage dashboard. Other ComfyUI cloud tools run for one person at a time. Floyo runs for the whole team, with transparent per-generation costs.
Ready to try it?
Upload a microscope image and run it. The subject gets isolated, cleaned, and sharpened in one pass.
Questions? Watch the free course or check the FAQ above.
Read more