Ultimate Upscaler
Flux ultimate SD upscaler with detailer daemon and tile controlnet. Easy but extremely powerful.
flux upscale
ultimate sd upscale
ultimate upscale
upscale
26
2.4k


Nodes & Models
DualCLIPLoader
t5xxl_fp16.safetensors
clip_l.safetensors
LoadImage
VAELoader
ae.safetensors
UNETLoader
flux1-dev-fp8.safetensors
KSamplerSelect
ControlNetLoader
FLUX.1/flux_shakker_labs_union_pro-2.0.safetensors
UpscaleModelLoader
4xNomos8kDAT.pth
CLIPTextEncode
SetUnionControlNetType
FluxGuidance
PreviewImage
ControlNetApplyAdvanced
SaveImage
AIO_Preprocessor
AIO_Preprocessor
DetailDaemonSamplerNode
UltimateSDUpscaleCustomSample
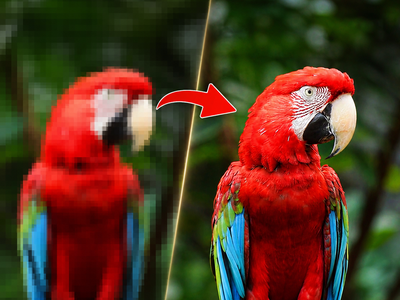
Make any image bigger and sharper using Flux Dev with tiled upscaling.
Upload your image and the workflow enlarges it using a 4x Nomos8kDAT upscale model, then refines each tile with Flux Dev guided by ControlNet tile preprocessing. Detail Daemon adds fine detail during the refinement pass. The result is a larger image with sharper textures, cleaner edges, and more visible detail than a standard resize.
Load your image, set the scale factor, hit run. Defaults work well for most images.
How do you upscale images with Flux and Ultimate SD Upscale?
Load your image and run. The workflow first enlarges your image with a dedicated upscale model (4x Nomos8kDAT), then tiles the result and refines each tile using Flux Dev with ControlNet tile guidance. Detail Daemon injects fine detail during the Flux pass. Three settings matter: upscale factor, denoise strength, and detail amount. Defaults are tuned for clean results with minimal tile seams.
Load Image Upload any JPG or PNG. Works with photos, digital art, AI-generated images, renders, and screenshots. The upscale model handles the initial enlargement. Flux handles the detail refinement.
Upscale By (default: 1.5x) Controls how much bigger the output gets. 1.5x is the default. Want a larger result? Increase it. 2x doubles the dimensions. Going above 2x works but takes longer and uses more memory. For most use cases, 1.5x to 2x hits the sweet spot between size and quality.
Denoise Strength (default: 0.22) Controls how much Flux changes each tile during refinement. This is the most important setting to understand.
Want a clean upscale that stays faithful to your original? Keep it at 0.22 or lower. The image gets bigger and sharper without visible changes to content.
Want Flux to add new detail and texture? Push it to 0.3 or 0.4. Skin gets pores. Fabric gets weave. Stone gets grain. The image looks more detailed but starts diverging from the original.
The catch: higher denoise also increases the risk of visible tile seams. If you see lines in your output, lower the denoise. The "Linear" seam fix mode and 8-pixel padding help, but they can only do so much at high denoise values.
Detail Daemon (detail_amount default: 1) Adds fine detail during the Flux refinement pass. At 1, it adds a noticeable layer of sharpness and micro-detail. Lower it toward 0 for a softer result. Higher values add more texture and grain.
This setting works together with denoise. If your denoise is below 0.2, Detail Daemon won't have much room to add new detail because Flux isn't changing enough of the image. For Detail Daemon to have a visible effect, you need denoise in the 0.2 to 0.4 range.
ControlNet Tile Strength (default: 0.6) Controls how closely the output tiles match the structure of the original. At 0.6, Flux follows the original composition and layout while adding detail. Lower values give Flux more freedom. Higher values lock the output closer to the input. For upscaling, you want this at 0.5 to 0.7 to keep the image looking like itself.
Tile Size (default: 1024x1024) Each tile is processed at 1024x1024 pixels, which is Flux's native resolution. No need to change this. Overlap is set to 64 pixels with 8-pixel padding for clean blending between tiles.
Prompt The positive prompt is empty by default. For a straightforward upscale, leave it blank. If you want to steer the detail Flux adds (for example, "sharp photorealistic detail, fine skin texture, fabric weave"), add it here. The prompt applies to every tile.
What is the Flux Ultimate SD Upscaler good for?
This workflow is built for making images larger while adding real detail, not stretching pixels. It works best on AI-generated images that need to go from 1024px to print or display resolution, photographs that need enlargement without losing sharpness, and digital art where you want the final output at a higher resolution than the original canvas.
AI-generated images. Most AI models generate at 1024x1024 or similar. If you need the image at 2048px, 3072px, or larger for print, product pages, or presentation decks, this workflow adds the detail that a standard resize would smear. Flux adds texture and sharpness that the original generation didn't produce at the smaller size.
Product and e-commerce photography. Upscale product shots for hero images, zoom views, or print catalogs. ControlNet tile guidance keeps the product looking identical to the original while Flux sharpens textures and surfaces.
Portfolio and print work. Scale digital art or renders to print resolution. Detail Daemon adds the fine grain and texture that makes an image look native at the larger size instead of upscaled.
When not to use this. If you need a fast 2x resize without any AI refinement, a standard bicubic or Lanczos resize is faster and free. This workflow is for when you want the upscale to look like the image was generated at the target resolution, not resized to it. The Flux pass adds real detail, which takes time and compute.
FAQ
What upscale factor should I use with the Flux Ultimate SD Upscaler?
1.5x is the default and works well for most images. 2x is the maximum for clean results without visible artifacts. Going above 2x is possible but increases the chance of tile seams and inconsistencies. For large jumps (3x or 4x), consider running the workflow twice at 1.5x to 2x each pass.
What denoise strength should I use for upscaling?
0.22 is the default and keeps the output faithful to the original. For more added detail, try 0.3 to 0.4. Above 0.4 you risk visible tile lines and content changes. If you see seam lines in your output, lower the denoise first. The relationship is direct: more denoise = more detail = more risk of seams.
What does Detail Daemon do in this workflow?
Detail Daemon adds fine micro-detail during the Flux refinement pass. It sharpens textures, adds grain, and enhances small features like skin pores, fabric weave, and surface roughness. Set it higher for more detail, lower for a smoother result. It works best when denoise is between 0.2 and 0.4, since it needs Flux to be changing the image enough for new detail to appear.
Can I upscale photographs with this workflow?
Yes. Photographs upscale well at denoise 0.2 to 0.25. Flux adds sharpness and fine texture without changing the content of the photo. For portraits, keep denoise low (0.2) to avoid altering facial features. For landscapes and architecture, you can push denoise higher (0.3) to bring out surface texture.
How do I run the Flux Ultimate SD Upscaler online?
You can run this workflow online through Floyo. No installation, no setup. Open the workflow in your browser, upload your image, and hit run. Free to try.
Read more
0
Reply